This post is part of our #GetStarted series, helping entrepreneurs and marketers grow their businesses.
Email automation is nothing new. For years, marketers have been setting up automated email campaigns to onboard new users and engage existing ones. From your standard “welcome” email to your “personal” greeting from a company founder, to that lovely email you receive on your birthday giving you a 10% discount, these days everyone is using automated emails.
While email automation has been going on for years, it’s becoming more and more accessible thanks to the growing number of tools now available to help people with various levels of technical skill to create and manage effective email campaigns.
One of these tools is MailChimp and that’s usually what Simpleweb recommends to clients.
MailChimp allows you to save a huge amount of customer data and, when set up correctly, can be used as a lightweight CRM (Customer Relationship Management) system. Using customer data, you can create automated email workflows based on your customers’ actions, meaning you can send your customers relevant emails that will encourage them to engage with your product or service.
In this post, we’re going to take a look at how you can create effective automated email workflows that will help you increase engagement and delight your customers, and explain how to get these set up in MailChimp.
Identifying user events for your automated emails
Before setting up your automated email campaigns, you need to consider what you actually want to get out of them. What actions do you want your customers to take as a result of your emails? Which actions imply customer engagement? Which actions could trigger automated emails?
In his Startup Metrics for Pirates talk, Dave McClure discusses 5 steps most startups want their customers to take. These steps make excellent guidelines for picking out customer actions to target with email campaigns.
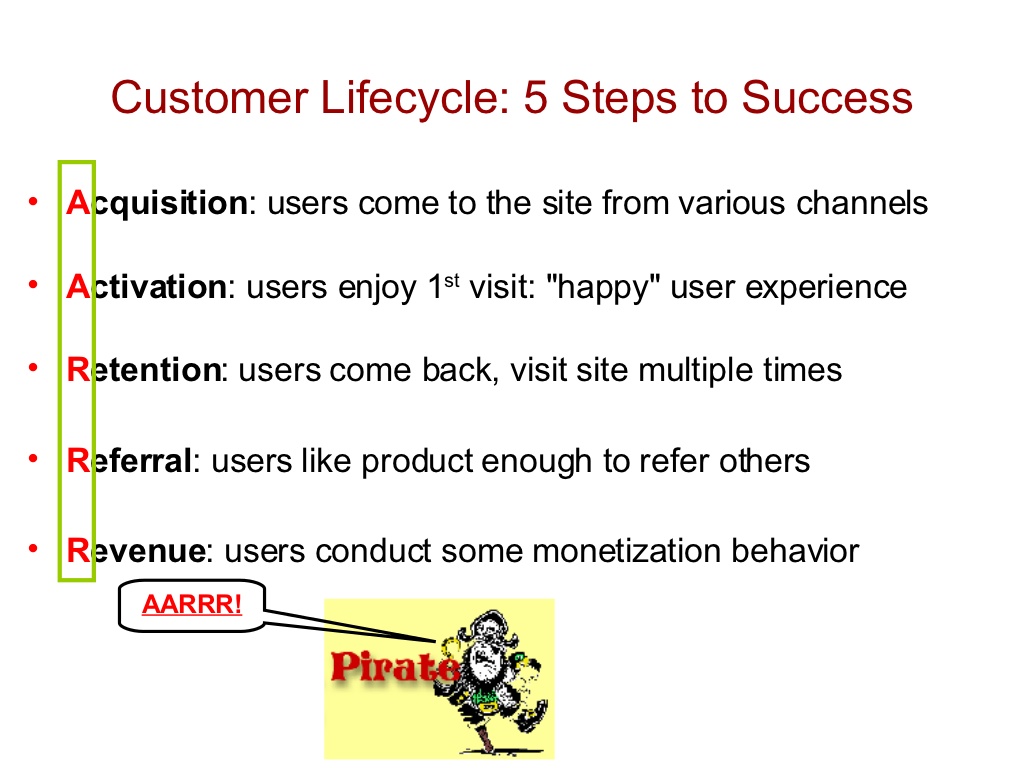
Exercise: For each of the 5 steps above, choose an action that your startup could use to trigger an automated email.
Take Contactzilla as an example. Contactzilla is a SaaS product that Simpleweb developed, selling a team-based contact management solution to businesses and organisations.
For Contactzilla, we might choose the following actions:
- Acquisition – customer creates an account
- Activation – customer creates an address book
- Retention – customer logs into account for the 5th time
- Referral – customer invites someone else to share address book
- Revenue – first card payment is taken from customer
Once you’ve narrowed down exactly what you want your customers to do, the next step is to get the relevant information into MailChimp…
Events in MailChimp
Note: You will need a developer to hook your system up to the MailChimp API. Don’t have a developer? Get in touch with Simpleweb and we’ll point you in the right direction.
Hooked up correctly, you can fire off all the customer data you identified using the 5 steps above straight over to MailChimp. This information will be stored in MailChimp as events against subscriber profiles.
Take a look at this screenshot of part of the Contactzilla subscriber list in MailChimp.
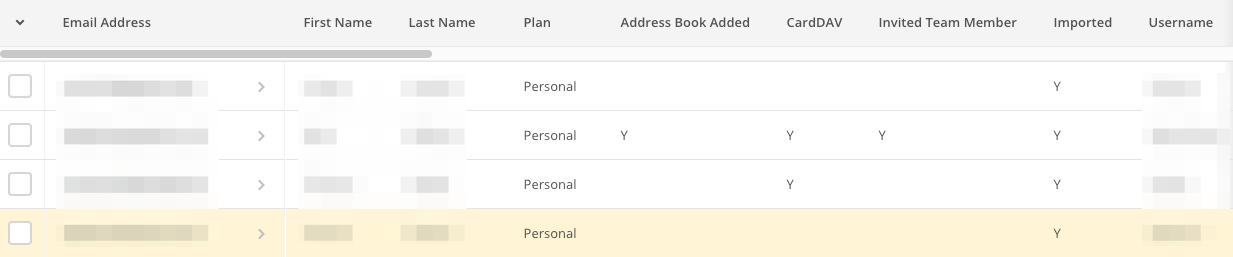
Every time a customer registers for Contactzilla, their email address, first name and last name are fired off to MailChimp and this information is stored in their subscriber profile.
Every time that customer completes one of the pre-set actions (in this case, adding an address book, syncing with CardDAV, inviting a team member or importing contacts), this information is fired over to MailChimp and stored as an event in the subscriber profile under a custom field created for that action.
In the above screenshot, data is stored as a “Y” if the customer has completed an action or left blank if they haven’t yet (although an “N” could have been used instead). Data can also be saved in date or numerical formats.
Events based workflows
Once the correct data is being sent to and stored in MailChimp, you can set up automated email workflows based on the actions your customers are completing, allowing you to send relevant emails to the right customers.
Let’s go back to the 5 steps we discussed earlier and look at how we could use the information collected to create automated email workflows for Contactzilla.
- When a customer creates an account
- Immediately send a welcome email
- 2 days later send an email with instructions on how to create an address book if “Address book added” field is blank
- When a customer creates their first address book
- 2 days later after address book is created, send an email asking user to import contacts if “Imported” field is blank.
- When a customer logs into account for the 5th time
- Now we know the customer is engaged, we can email them to ask for feedback.
- When a customer invites someone else to address book
- Immediately send email offering discount for referrals
- When the first card payment is taken from a customer
- Immediately send receipt
Exercise: For each of your 5 steps, brainstorm ideas for automated emails that you could send when these events are stored in MailChimp. Consider how much time you want to pass between the event being stored and sending the email. Be mindful of how this will affect different types of users – you don’t want to overload your customers (for example you should never be emailing them twice in the same day asking for different things).
Setting up workflows in MailChimp
Note: We’re going to assume you already have a basic knowledge of setting up campaigns in MailChimp but if you don’t, check out their Getting Started guide.
Once you know what you want to email your customers about, and when, and you have the relevant data stored in MailChimp, you’re ready to start setting up workflows.
In this section, we’re going to show you how to setup a workflow based on the following assumptions for Contactzilla.
When a customer registers for an account we:
- immediately send them a welcome email
- 2 days later ask them to add an address book if they haven’t already.
It’s worth noting that MailChimp offer some pre-set workflows that are worth a look. In this post, we’ll only be looking at custom workflows.
Tutorial
In the Automation panel, choose the list you want to email and select the “custom” workflow. Do check out the pre-set workflows, but for the sake of education, we’re going to select “custom” and start from scratch.
The setup page is fairly simple, asking you to name your campaign, choose a sending address and giving you options to track certain metrics around your campaign. This is much like setting up a basic email campaign in MailChimp.
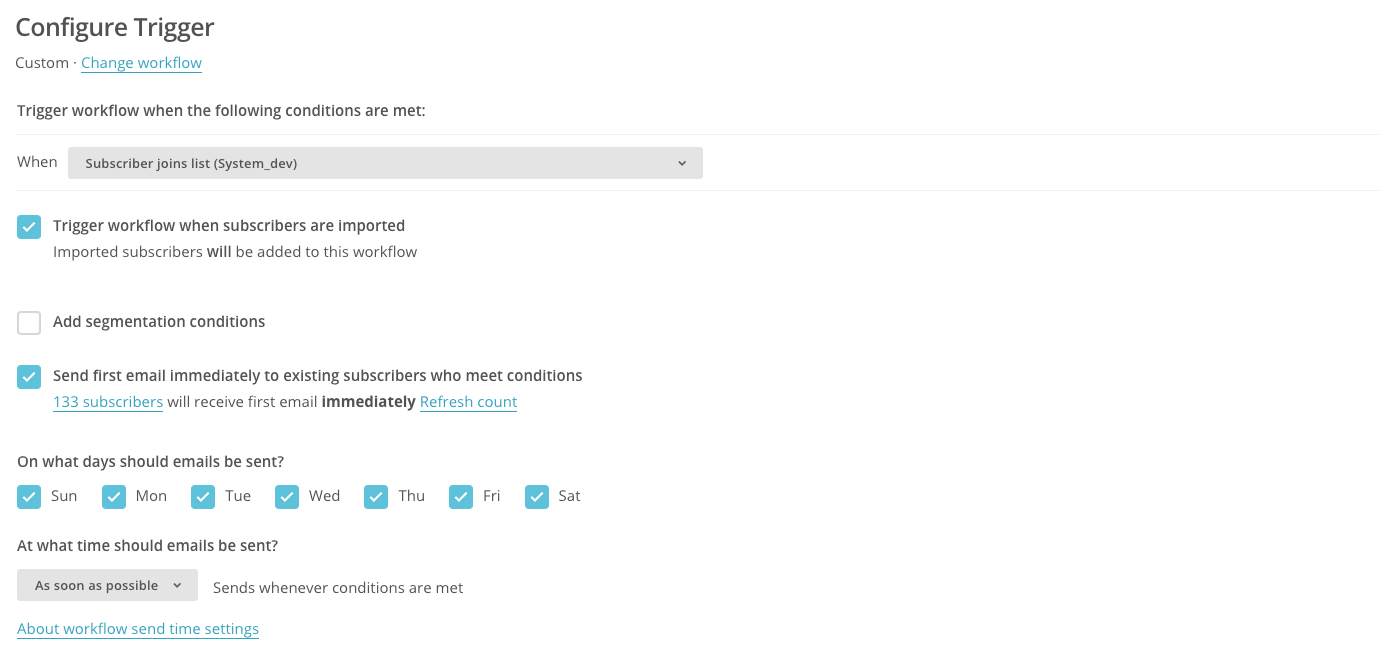
Next you’ll be required to set up a trigger, which tells MailChimp when to send your email.
As we want to send welcome emails to new customers, we are going to trigger the workflow when subscriber joins list (your selected list).
In this example, we’re also going to choose to send the welcome email to subscribers that we import, as well as ones who sign up themselves.
We don’t need to worry about segmentation for this email (but we’ll go through it in the next use case).
As we want to email customers immediately once they’ve signed up, we’re going to select send first email immediately to existing subscribers who meet conditions.
As we want the email to be immediate, we’re going to leave every day selected and choose as soon as possible for time.
Here’s what our completed form looks like:
Next we can select a delay. We’re going to send this email immediately after workflow is triggered but you could delay for an hour or two if you wanted.
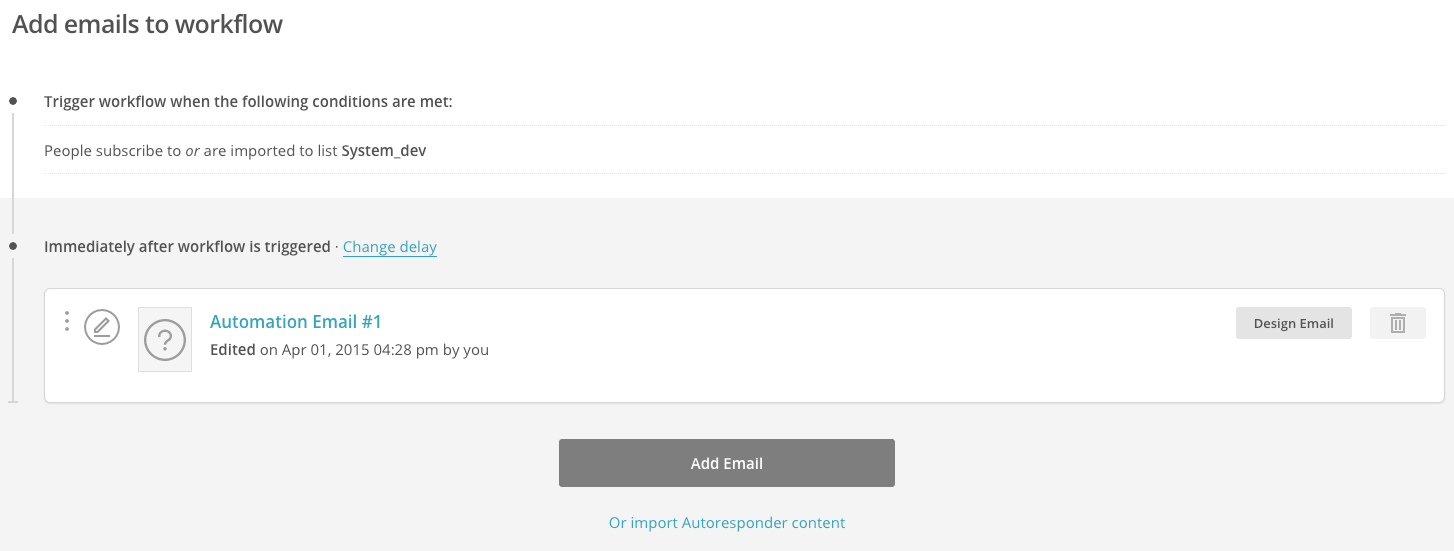
Now you need to add your email. Click design email and you’ll be taken through the same process you would when creating any email campaign in MailChimp (if you haven’t done it before, have a look at this tutorial). Check out these tips from Econsultancy for some inspiration to help you design an effective welcome email.
The follow up email
Next we want to follow up with the new customer and encourage them to engage with Contactzilla. This is an email we will be sending to customers 2 days after they sign up, asking them to create an address book, if they haven’t already.
You’ll need to create a new custom automation workflow but this time, the trigger page is going to be a little different.
Even though we are sending the email 2 days later, the trigger is still the customer signing up so we again want to select subscriber joins (your selected list) in the “When” box.
This time we do want to add segmentation conditions, as we only want to send this email to customers who haven’t already created an address book.
Therefore we select only subscribers who match all of the following conditions – Address book added is N.
For additional control, we’re only going to send these emails between 9am and 5pm Monday-Thursday so that support requests don’t pile in over the weekend (not to suggest that this is a good idea, but for the sake of demonstrating MailChimp’s functionality, let’s do it!)
Now you just need to design your email.
Exercise: Try signing up for accounts with some successful companies and see what emails you get over the next few days for inspiration.
Conclusion
While there are plenty of solutions available to help you created events-based automated email campaigns, we usually recommend using MailChimp as it is easy, well documented and popular with developers.
It’s easy to get caught up playing with workflows but we highly recommend identifying your desired events and planning your triggering logic before you even open MailChimp. You shouldn’t be sending emails for the sake of it and careful planning is the only way to create automated emails that your customers will actually want to read.
Don’t let your workflows get too complicated and make sure you consider all possible user journeys to make sure there’s no way you can bombard your customers with emails. This will require careful planning but it’s worth every minute.
If you need any support with MailChimp, get in touch with Simpleweb today to see how we can help you.